Wednesday, 26 January 2011

Introduction To Unit 107 (Presenting Photo Images)

This unit is to show the ways of presenting our work.
There are many ways of presenting photographs like:


  • Mounting
  • Framing
  • Showing it in a slideshow
If you are doing it for your own home you can present them:

  • On a canvas
  • Mug
  • Mouse mat
and many other things.

Initial Ideas

The problem with me is that i don't plan ahead, i just go out and do it. Which does make me mess up a lot, also i'm not good at thinking of ideas in such a limited time.
So far i am still sticking to the sweets and people theme, yet i am thinking of more along the line of friends as a theme as it is rather hard to find sweets big enough to show in photographs.
I have now found myself a new memory card so i wont have the trouble of taking photos and losing them.
I was going to also use people who wear alternative clothing but i don't have many friends who wear those kind of clothes and the ones that do are camera shy.

Photoshop Task

In class we were taught how to change coloured photographs into black and white, also how to turn a photograph from colour to sepia.
I don't use photoshop because it's too expensive to buy, i use GIMP it's a simpler version of photoshop. 


Before                                                                               


After


How i did it


I opened up gimp and opened up my image.
I clicked on Colors then selected Colour Balance i just played around with the settings until i was happy with the outcome.


Unfortunately i didn't realise until i finished editing this photograph that it was actually taken on my Sony Erricson K800i.


How i did it

I opened my image and selected the lasso tool and trace around the baby and the background so all of the background is selected.
I then clicked on Colours then selected Colourize.
 I then played around with the settings until it went black and white.


Accidents happen

There is a reason why there isn't a before. Once i finished editing my image i accidentally saved over the original image. 


Before


After

With this photo i duplicated the original image.
The copied image, i messed around with brightness-contrast until i had 3 strong colours.
Next i turned it black and white by pressing colors-desaturate.
Once i did that i right clicked on the layer and selected Add Alpha.
After i had done that i clicked on the erase tool and erased the black and white from the lollypop.


With this image i was trying out filters.
To get to filters on Gimp you click filters and then just tested them out to see which ones you like.
Starting with the top left square.
This filter is pixelate, it simplifies the image into an array of solid - coloured squares.
 Bottom left is soft glow this just simply adds a soft glow to the image, you can also choose how strong the glow is.
Top center is sketch, this simply makes your image look as if someone has sketched it. 
Bottom center is neon glow.
Top right Predator, it adds a predator look to the selected region (or alpha)
Bottom right is a coffee stain, it adds a realistic coffee stain to the image.

Aperture and Composition Task


Aperture Control


Fast Shutter Speed


10/1250 second


F/14.0


38 mm


800


Slow Shutter Speed


NIKON D60
10/20 second
F/32.0
38 mm
800


These pictures have turned out worse than i expected, the lighting was really bad because i was using natural lighting and it was a very dull day, yet i am happy with the photos because i captured using fast and slow shutter speed.


Narrow Depth of Field


This is my attempt at doing Narrow Depth of Field. What narrow depth of field is where part of the photo is in focus and using a low f number on the camera settings.


Wide Depth of Field


This is my attempt at doing Wide Depth of Field.
What wide depth of field is where everything is in focus and using high f numbers on the camera settings.


Composition


Colour


NIKON D60
10/300 second
F/5.6
55 mm
280


The reason why i chose this picture is because of how vibrant the colours are.
I'm really shocked how well the colour came out because the day i took this photo it was raining and very dull.


Distance


NIKON D60
10/3200 second
F/9.0
42 mm
100


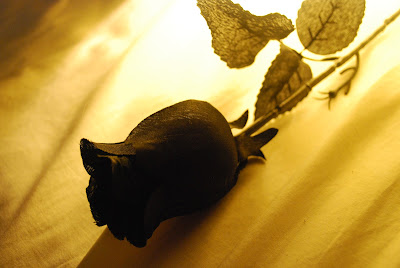
Shadow/light


NIKON D60
10/200 second
F/4.5
26 mm
1600


This is one of the best photographs i have taken. Personally i think i got the right amount of light and shadow to make this photo great. All i did was put a plastic rose on my pillow and lay a lamp and the bottom of the stem so the light was shining towards the rose bud.
I could of made this picture better by making the pillow have less creases in it.


Evaluation


For the composition task i did have to use old photos i had done on my camera because my memory card was corrupted and was telling me i had no photos on my camera even though i had just taken a photo, which did put me back with my work.

Monday, 24 January 2011

Introduction

Level 1 VRQ Qualifications in Photo Imaging

The assignments i have chosen to do are Assignment 105: Introduction to image capture of people and Assignment 108: Digital image manipulation.

Assignment 105

This assignment gives us the opportunity to show that we can use camera skills in recording images.
This includes producing a minimum of 6 thematic image of people by using the right and appropriate equipment, capturing the images and presenting our final images. We also have to provide a written account to show evidence of everything we have done, we had a choice of doing this via sketch book or an internet blog, of course i chose an internet blog.

Assignment108

This assignment gives us the opportunity to digitally manipulate images (creating images that have been digitally modified for visual effect). We also have to provide evidence to show what software we used and how we digitally manipulated the image.

Wednesday, 19 January 2011

Photo Shoot 1

I took some photos for my topic. I'm not sure if these will be part of my final photos. I will be taking more.

The things i used were:
Nikon D60 with a 18-55mm lense.
Also a lamp for lighting.

These are my photos so far:

Due to not having a tripod this picture turned out blurry.
I think that this picture would of turned out well if i had a tripod as my hand isn't steady.
 For this picture i tried holding tracing paper over the flash to make her skin has a nice texture, as you can see it didn't work as well as i planned, if i do this again i think i should either use a darker shade of tracing paper or turn off the lamp which was on at the time.
For this one i didn't have the right setting on my camera. So the shutter speed was slightly slow and made the picture slightly blurry.


This photo could be a little brighter, but i also like it the way it is. This is because the model is upset so the lighting is showing her emotion.
I think the photo would look better is the background was a little brighter.


 Due to the model not standing still this photo came out slightly blurry.
To make this picture better i could sit the model down.

This picture should be lighter.
The reason it is dark is because i turned off the lamp and i turned on the main light.


This is my favourite photo i took. I like how the light from the lamp hits her face and part of the lollypop.
To make this picture better i could of angled the lamp more in front of her.


Most of these photos were taken when the models were preparing to pose. I found it more fun this way because they look better when they're not expecting it.


I tried a little bit of editing too (the editing software i used was GIMP):


This is my favourite edit, i like the cartoon effect.
This is how i did it:
I opened the picture and duplicated the layer.
I went to Colours > Brightness-Contrast.
I adjusted the brightness and contrast until i had 3 strong colours.
After that i went to Colours> Desaturate.


I have to admit i did this for fun, but i think it turned out well. I opened up the lips picture and drew round it with the free hand tool (or it could of been create a path). I then copied and paste the lips onto the picture.

Wednesday, 12 January 2011

Introduction To Unit 108 (Digital Image Manipulation)

This part of the assignment is to show that we can digitally manipulate images by using a photo editing software and also being able to support it with evidence.
The class is using photoshop, i prefer to work on my laptop so i don't have to rely on getting a computer at college, by using my laptop i will not be able to use photoshop as i don't have it, so i'll be using GIMP.
Gimp is a simpler version of photoshop which is also free. 

Research On Lenses

Lenses

There are three basic types of lenses:
  • Standard
  • Wide angle
  • Telephoto
Lenses are measured in millimeters which is known as the focal length of a lens. A standard size lens is 50mm for a 35mm camera, if a camera lens is shorter than the average size it is considered as a wide angled lens, but if the focal length is longer it is a telephoto lens.

Wide Angled Lens


These lenses are great for landscape photographs as the lens lets you have more in a picture than a normal lens would. They are also good for highlighting foreground objects with the background fading into the distance. The average focal length for a wide angle lens is 24mm and 28mm.

Telephoto Lens


This lens is the opposite of a wide angled lens, it is good for sporting events and reducing the depth of field. With this lens you can focus on your object and get a very nice and clear photo while the background surrounding it is out of focus.

Macro Lens


Macros lenses are great for close up photography, the quality of the image is very high, it has similar properties to a normal lens but it is better at focusing a lot closer to an object. The common focal lengths are between 50mm and 105mm.

Fisheye Lens


The reason why this lens is called fisheye lens is because it look like a fisheye, it gives you the effect that the center is popping out at you. This lens bends the photo so the sides of the picture seems to be further away.

Shift/Perspective Control Lenses


These type of lenses are good for when you are taking photos of buildings especially tall buildings, when you use this lense you don't have to worry about tilting your camera to get the whole building in because the lens can be adjusted so you can get all the building in the shot while keeping your camera upright.

Teleconverters


This converter sits between your camera and the lens, These are not the best to use especially if you are on a tight budget because it doesn't give a good quality photo, it makes focusing harder and you need to use a slower shutter speed than you usually would. These problems don't occur with a 1.4x converter (most professionals use these). Standard models are the 2x and 1.4x converters. The good thing about this is that it increases the focal length of the lens.


Filters


Filters are used for increasing the contrast, changing the exposure, capturing visible light and minimizing reflections.

UV filters

UV stands for Ultraviolet. It is light that is invisible to the human eye. UV filters are used for many things like cutting down on haziness, like in mountains and coastal areas, it is also used for protecting the lens, if you have the filter on at all times it protects the lens from scratches and dust.

ND filters

ND stands for Neutral Density. It helps the photographer use a larger aperture for a longer time. Without a ND filter most lenses wont let you use a small enough aperture for long exposures.

Polarizing filters

Polarizing filters are great for reducing reflections on non-metallic surfaces such as water and glass. Most of the filters are circular and you can change the level of polarization by rotating the outer layer of the filter. These photos also have the ability to completely change the out come of the photograph.

Macro filters

Macro filters/close-up filters are not ordinary filters they are more like an extra lens that is great for close-up photographs even when using a telephoto lens. Even though this filter is good, a extension tube is better. Extension tube change the closest focus length without effecting the quality of the image.

Colour filters

Not many photographers use colour filters anymore because they can be easily reproduced digitally with the help of colour levels and channel on a photo editing software. Colour filters are mainly used for black and white photography to manipulate the contrast.

IR filters


IR stands for infrared, these wavelengths are on the opposite side of the light spectrum from UV. When using a IR filter it only allows through IR light. The sensors on digital camera these days constructed so that it doesn't let through IR light.

Research On Photographers

Jane Bown


(Picture found on http://www.digitalpicturezone.com)
("People describe me as a portrait photographer, but I am not. I am a hack" -  Jane Bown http://www.guardian.co.uk/artanddesign/2009/oct/18/jane-bown-photographer-retrospective-exposures).

Jane bown was a photojournalist for The Observer in 1949. Before she worked for The Observer she worked as a child portrait photographer. The first portrait for The Observer she took was of Bertrand Russel.
All her photos were in black and white, while using only available light and sorts her settings by how the light falls on her hand.

I preferred the simplicity and directness of black and white. It emphasizes and the underlying patterns of light and dark and confers a natural harmony on the subject. Black and white is quick where colours is noisy and distracting, and I feel that it allows the personality of the sitter to come through” - (book)Exposure, Jane Bown.


The main reason i chose Jane Bown was i work like her, the majority of the photos i take are in black and white also i only use lighting that is already there mostly natural lighting.


[Pictures found on artrabbit.com]


(picture found on artrabbit.com)
She took photos of many famous people, including Queen Elizabeth II for her eightieth birthday portrait.
While photographing people she’ll become invisible to the person she is taking a photo of, this is because she prefers that the person can just be themselves than making a situation.


This is a photo of Samuel Beckett, this is one of her "Jackpot" shots. I like how the tone brings out the texture of Samuels face.


Philip-Lorca diCorcia

Philip was born in Connecticut in 1951. He studied at the School of the Museum of Fine Arts, Boston fine arts in Boston then went onto study at Yale university where in 1979 he was awarded Master of Fine Arts in Photography.


A lot of his work was very carefully planned out and staged but when people looked at his work they would think it was a photo of someone every day life.

His style of work is documentary photography. The title of his photos are usual where the place is.

"His work is about taking everyday occurrences beyond the realm of normality, trying to inspire in his picture's spectators an awareness of the psychology and emotion contained in real-life situations."
[wikipedia http://en.wikipedia.org/wiki/Philip-Lorca_diCorcia”]

He uses natural lighting so the photos look natural, otherwise it would be a give away that the photos are staged. 

[http://www.thecollectiveshift.com/show/portfolio/diCorcia]

This photo is titled "Street work". i like how one woman is in light and the rest of the photo has dull colours, it makes her stand out which makes her the main object in this photo.

[Picture found at  http://gothamist.com/2006/02/14/good_news_for_p.php]

In 2001 diCorcia was sued by an Orthodox Jewish man because Philip-Lorca diCorcia sold a photo with him in without his permission this photo was also in his book "heads" it was also hung up in a gallery in Chelsea.


I enjoyed looking at his "heads" work, because the photographs look like they were staged (even though it partly was). I really like how focused the image is on the persons face without them really knowing.
When taking photographs of a random person (well anyone) you should get them to sign a model release form so you have permission from them to sell/publish an image with themselves in it.


Diane Arbus

Most people go through life dreading they'll have a traumatic experience. Freaks were born with their trauma. They've already passed their test in life. They're aristocrats.
Diane Arbus 

Diane was born in New York in 1923. She was famous for her black and white photographs of "freaks". She was taught how to photograph by her husband Allan Arbus.
Her first magazine assignment was published in July 1960 in the magazine Esquire, and she also wrote articles that accompanied her photos in magazines like The New York Times Magazine.

I like her photographs because she chose individuals that looked different than anyone else. She also did black and white photographs which i admire because i love how the tone brings out the patterns of people and can also set the mood.
I love the people she used for her photographs because the images show the person they really are and thy're not pretending to be someone they're not.


After 1962, she used a Rollieflex twin-lens reflex camera . When she took photographs she would hold the camera at waist level so she was photographing reality than what she could see through the lens.

In 1971 Diane Arbus took her own life due to depression.


Corrine Day
"Corinne opened the door for a whole generation of photographers, designers, models and stylists who suddenly saw that the fashion industry didn’t have to be this exclusive club for the privileged and perfect." - Belinda White


Corrine Day was a british fashion/documentary photographer, she also use to be a fashion model.
In 1993 she photographed Kate Moss for the cover of Vogue
In 2007 Corrine photographed Kate Moss, they had a serious conversation which made Kate Moss show her true colours during the shoot.


 [Picture found http://www.wwd.com/media-news/fashion-memopad/corinne-day-dies-at-45-3232368]


Corrine Day's photography inspires me because she chooses the right locations and she makes the tone of Kate Moss' skin really soft. And she does do black and white photos which i do admire.

August 7th 2009 Corrine was diagnosed with a life threatening brain tumor, Kate Moss and a few other people raised money for Corrine to have chemotherapy in the USA.


This is my favourite photo she has taken i love how the lighting is, it brings out the vibrancy of the models skin in the image to give it some life so it isn't dull.


Chris Killip


Chris Killip was born in The Isle of Man and in 1964 moved to London where he became an assistant to an adverting photographer named Adrian Flowers then went on to become a freelance photographer.


He was well known for his black and white photographs (that's why i chose to research him). In 1988 his work was published as "In Flagrante".
The photographs he took were in the era where Margret Thatcher was in government and most of his images represents everything Thatcher stood for and how hard living was for people. "a dark, pessimistic journey" - quoted by Gerry Badger [wikipedia - "http://en.wikipedia.org/wiki/Chris_Killip"].


[Picture found http://www.nyphotoreview.com/NYPR_REVS/NYPR_REV769.html]


This is my favourite photos Chris Killip did. The black and white really sets the mood of depression as well as the lighting, just by looking at the photo you can tell it was a rough time for everyone.


1988 pirelli paid Chris Killip to photograph the tire factory in Burton-Upon-Trent. At first he wasn't successful because he only used the light available which wasn't much because it was a dark factory, two months later he started to use a large format camera with a flash and photographed for three months. In 1989 his finished work was exhibited in the Victoria and Albert Museum.


Speed-Over


This photographer isn't known worldwide but they caught my eye on a website called DeviantART.
Here is an interview i did with them:


What inspires you to take portraiture photographs?


I just have better direction when the focus is on people. Its a more natural flow to work with a person rather than an object, and i find that if the person is the subject of the photo then working with objects in the composition just comes more naturally.


What gave you the idea of taking photographs the style you have done?


I guess my style that you are talking about is called "alternative" by most people, and I had the idea to do that because it reflects what I find absolutely fasinating. I really find mainsteam glamour, portraiture, weddings, etc to be insainly boring as a photographer (dont get me wrong, there are some fantastic wedding images out there, but when it comes to taking them...yaaaawn).


Did any famous photographers inspire you for any of your photographs? If so who?


Robert Alvarado, Dave Hill, Jill Greenberg, Andy Silvers, and Dangerous Dolly are a few of my favorite photographers that inspire me to do what i do. Mr. Alvarado has actually been my biggest inpiration, and I find him to be the king of modern pin-up. 


Photos By Speed-Over


This is my favourite photo because it's out of the ordinary and the dull background really brings out the colours, patterns and texture of her clothes.

You can find Speed-Over on http://speed-over.deviantart.com/


David Hockney


“It is very good advice to believe only what an artist does, rather than what he says about his work.” - David Hockney


David Hockney is famous for being a painter, printmaker, stage designer and photographer. His work is manily in the style of pop art.

His photography work was mainly photocollaging. He would use a lot of small polaroid snaps or photolab-prints of a single subject he would then arrange them to make a full image, because each photograph was taken at different times and from different angles, the ending image has an affinity with cubism. He refered to these images as "joiners".
He discovered joiners accidently, he came across this method when he was taking polaroid photos of his living room and glued them together, this wasn't intended. When he had finished he realized it went into sequence as if the viewer was moving through his living room, after this he stopped painting  for a while to follow this new style of photgraphy. He got back into painting due to being frustrated with photography's one eyed approach.
[Pictures found google images]


Herb Ritts


Herb Ritts was an american fashion photographer, most of his work was black-and-white photography and portraits some in the style of greek sculputres. Some of his more famous pieces are of male and female nudes in what are called 'glamour photography'.


While living in Los Angeles, he became interested in photography, Herb and friend decided to shoot some photographs in front of an old Buick (automobile sold in the United States), this photograph made Herb become more serious about photography.
 In 1981 he photographed Brooke Shields for the cover of Elle, then he photographed Olivia Newton-John for her Physical album. Five years later he did the same cover pose with Madonna for her 1986 release True Blue.


He took many nude shots of Cindy Crawford and then went on to working with many magazines like Rolling Stone, Vogue and Glamour.


This photo of madonna i really like due to the contrast also the lighting making the texture of her skin really smooth. Also the lighting brings out her features of her face really well.


[Pictures found on google images]


Stephanie Cammarano


This photographer isn't known worldwide but they caught my eye on a website called DeviantART.
Here is an interview i did with them:


What inspires you to take portraiture photographs?

I have always been inspired by people, and loved the idea of depicting a person in a specific way using photography as a tool to communicate my ideas and thought processes. In terms of what inspires me, I try to find inspiration in all aspects of life. It's important to research current photographers and models, however I try to dig deep and find inspiration in the most obscure places. I think it's a great idea to also look at music, literature and film for ideas and as a reference, they often inspire the most interesting concepts for a portrait.
 
What gave you the idea of taking photographs the style you have done?


My aesthetic and style is quite dark. I have always been drawn to quite a dark and edgy style, this dates back right back to my childhood, as I started an early interest in horror films and alternative music such as metal and punk. Over the years I have refined my style to something that is quite conceptual and sometimes theatrical, but I still gravitate towards expressing a very dark mood in my work.
 
Did any famous photographres inspire you for any of your photographs? If so who?


I am always inspired by many different photographers, the work I produce is mostly influenced by fashion photographers. In the beginning, it was the work of Steven Klein, I fell in love with his fashion images because of the stylized and conceptual nature of them, and how elaborate his sets are. I really love the idea of creating art through fashion. His work alone inspired me to become a fashion photographer. Some other photographers I love include Ellen Von Unwerth, Steven Meisel, Craig McDean, Solve Sundsbo, Richard Avedon, Daniel Jackson, just to name a few. I am also forever studying current and past fashion designers, they help to inspire with their beautiful and innovative contributions to the industry.


The title to this photo is "The Epitome Of Self-Indulgence" these are lyrics to a song by Parkway Drive.
This photo shows Gluttony, this does connect to my theme as mine is to do with sweets and i do class donuts as a sweet.
The intention of the piece is to represent over-indulgence in a grotesque manner, the use of blood is to give the idea of gluttony being a deadly sin.
I like how the light is mainly on her face to make the view concentrate on the donuts and the lighting also brings out the colour of the sprinkles.

You can find Stephanie Cammarano on http://stephlesX13.deviantart.com/


Suellen Parker


The reason why i chose to do research on Suellen Parker is because her work is out of the ordinary. When i looked at her work it kind of confused me about the photo. The questions that ran through my head were "Are these people edited?" "What did she use to make the people?" "How did she get them to where the shot was taken?"
I then looked her up a bit more.
The characters in her photographs are from a memory from her past or a stranger that she has remembered. When she thinks of these people she would create the with plastiline clay. Once she had put this person together she would then photograph it in a studio with a blank backdrop, then Suellen would build up a library of photographs of walls and things she can use as a backdrop to use with the model.
Once she has everything she needs Suellen would start to digitally editing the clay models by adding colour to them, because all the models are is grey clay. She would next find the right background to match the personality of the model and then just messing around with the photo adding and taking things away until she feels as if it is finished.

[Pictures found on google images]